Friday, December 16, 2016

"Away in a Manger" Christmas Gift Tags - Watercolor - Printable

Merry Christmas, friends!

I have some Christmas Tags

to share with you.


They are made with watercolors


and then I changed them to digital art in illustrator.


 Humble little manger friends

are soft and light,

a sweet touch to your

Christmas wrap.


Here is the link to the PDF.


With the light color 

and white background,

your printer won't use a lot of ink.

I think there are some in this mix

for both children and adults.

I hope you enjoy them,

Deb


Links:


Friday, October 7, 2016

How to Paint Rustic Pheasant Feather Wall Art

Harvest, Cornhusks, and Pheasant Feathers...

things that remind me of fall.


Pin It!

I thought I would share a few painting tips

on the pheasant feather wall art.

First I love that it is a big long piece.

I used 2 cedar fence boards, 55.5" long.

So the piece measures 11 x 55.5".

Based in a brown wash

(watered down brown paint).

Let that dry.

Paint the next coat a white and grey mix,

lifting at the edges to get a worn edge look.


I sketched a chalk line shape of the feather.


Using a a folded piece of cardstock paper,

I dipped in tan and outlined the feather.

Then filled in pulling from the outside to the inside.


The first tan color I used ended up being too light.

I would start with a mix of Folk art camel and Raw Sienna.

I used a brown stain too.

I was trying to achieve a golden brown.


On the first go round,

I drug wide brown stain stripes with the cardstock.

You could use a dark brown paint. It will dry faster.

Then I painted a little more raw sienna and brown to make it darker.

Then I used a brush to paint a little black over the stripes.


On the lower right side of the feather, I splattered

some camel color and then some brown.

Paint finer detail black random stripes here.


On the edges I used dark brown 

and used my brush to pull in a feathered look.
Pin It!

If it is not feathered enough,

use your gray and pull from the outside to the edge of the feather.

This will help make it look airy.


I think this would be a great outdoor welcome

with some pumpkins!


Hope you try it!

Deb


sharing at:


Sunday, August 28, 2016

How to Paint a Pet Portrait

Hey creative friends!

I like simple brush strokes

and rustic paint styling.

I thought I would share

how you can use a simplified tracing method

to achieve a textured pet portrait.


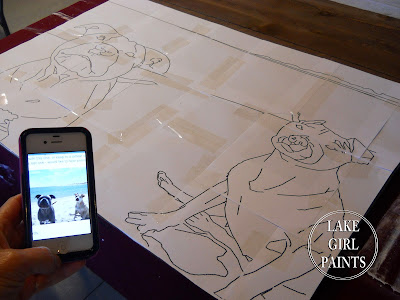
Here are some cute beach dogs -


First start with your pets photo

and you will need to put it into photoshop.

Brighten the photo and give it a lot of contrast

so you can clearly see your pet's  face.

Create a new layer on top of the photo

and trace your pets outline and features.

Print onto paper and transfer onto your board.


I did a chalk transfer onto brown washed boards.


Using the easy dip and drag paint method,

with cardstock, drag paint across boards

around the outline of your pet.

You could certainly try this on canvas too,

but won't have quite as much texture.


I used a brush for the sky.


Then I chalked in the finer details of the face.


Now you have  a good outline

and can use a brush or cardstock 

to fill in areas with color.

You will need finer brushes for the eyes.


Even if you don't have a photo of your dog on a beach,

it would be fun to put him on a beach!


Hope you give it a try!

Deb


Link Parties:


Tuesday, August 16, 2016

Painted Art to Digital Art

It's back to school here this week!

I love learning.

I thought I would share with you

a tool in photoshop that 

is fun to use.


So, I've taken my painted feathers

and changed them to digital art.

They looked like this when I painted them on a board.


Pin It!
I scanned them into my computer.

I used the pen tool in photoshop to cut out around them.

Then I used Edit>Transform>Warp

to bend each feather.


Now I can put them into a repeating pattern

and use it on fabric or other surface design.

What I love about this

is that you can still have a painterly look

with digital art.

Hope you have some fun projects this week!

Thanks for your visit,

Deb


Monday, August 8, 2016

Art Journey Takes a Turn / Feather Trivet

Hey Friends!

Gosh, I know it's been awhile.

Change is in the works for my art and I'm excited about it!

You know I love to have my hands in paint,

but these days I'm holding and loving my new grandson.

Building signs and painting furniture is not so practical for my day's work.

Instead, I'm working in photoshop and Illustrator 

and creating designs there.

I'm loving my new journey and am excited about 

what new options might be available for my art.


I will always be working on creative projects

for my home

and will post about those

along with my new pattern designs.

Last week I led a group of ladies in a craft class!

We made planked wooden trivets.


We used the scraping method

(dip and drag with cardstock)

to create beautiful feathers.


You might remember we made holiday trivets

before in this post.

Use five 8" 1x2's.

1/4" drill bit for holes.

#10 or # 12 washers.  You'll need 12.

Cotton clothesline cord.


This is a fun group project.

Maybe you can plan a fall craft party too!

I always hope to share things 

that you would love for your home.

Blessings on your journeys ,

Deb


Wednesday, April 6, 2016

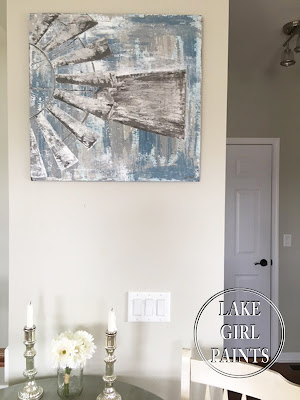
Painting Windmill Art

Every time I drive this road

I see a windmill

stand like an iconic country silhouette

 against the sky.


And every time, I think

"I want to paint that".

So my country roots got the best of me.


My wood square measures about 25".

I used cardstock to dip in my paint colors

and drag across the board,

creating a textural and layered background.


Then I transferred my pattern onto the board.


I used aluminum paint and white for my windmill base.

Then I shaded with aluminum and black.


I love the effect of the aluminum shimmer.


I like the art both ways -

with the white frame and without.


I will list these in my Etsy shop soon.

Thanks for stopping by!

Deb


Links: